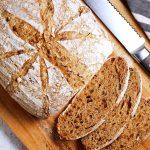
Slow Cooker Sourdough Bread
Slow Cooker Sourdough Bread - this recipe makes delicious Malted Grain Sourdough Bread.
Servings 12 servings
Equipment
- Digital scales
- Large shallow glass bowl
- Danish whisk or fork
- Banneton - oval 25 cm (10 inch) or round 21cm (8.5 inch)
- 6.5 L Slow Cooker (Crockpot) Oval but round can be used with round banneton.
- Dusting wand
- Non-stick baking paper
- Bread lame or scalpel
Ingredients
Starter feed
- 30 g white strong flour
- 30 g tepid water boiled and cooled or filtered
For sourdough
- 55 g starter active (bubbly)
- 330 g tepid water boiled and cooled or filtered
- 200 g white strong flour
- 300 g strong malted grain bread flour I use Matthews Cotswold Crunch
- 8 g salt flakes
For dusting
- rice flour I use brown rice flour
Instructions
- Start by feeding your starter around 10pm with 30g of tepid cooled boiled or filtered water and 30g strong white flour and leave on the kitchen counter with lid ajar. (Should virtually double and be bubbly by the morning).
- In the morning (around 7 am) put together the dough by weighing out 330g of tepid water and 55g of bubbly, active starter into a large glass bowl. Agitate to break up with a Danish whisk or fork.
- Zero the scales and add 200g strong white flour, 300g strong malted grain flour and 8g of salt flakes.
- Mix to a dough with a Danish whisk or fork. If the dough does not absorb all the flour add a little more water until it does. (More likely if using different flour and especially wholemeal).
- Scrape down the sides with a dough scraper and mix the scrapings into the dough to form a rough ball shape. (Do not “knead” at this point, you’re just bringing the dough together).
- Cover the bowl with a plate (I use glass) or you could use a glass pan lid and leave for 1 hour to rest at room temperature. The dough will spread out. This initial mixing and resting is known as the autolyse method.
- Use a wetted hand or a dough scraper (my preference) to perform the first set of pulls and folds which will activate the gluten. Pull the dough up from one side and fold across to the opposite side turning the bowl as you go. Do this roughly 25 – 40 times until your dough comes together as a smooth ball that holds its shape. Takes about a minute or so. Cover the bowl with a plate and leave to rest for 30 minutes at room temperature.
- Repeat the pulls and folds 3 more times every 30 minutes. You’ll only need to do half as many folds to get a ball of dough that holds it shape. You’ll feel the tension as the dough won’t want to stretch any more.
- After the final set of pulls and folds cover the bowl again and leave the dough to prove (proof) and double in size (will take on a puffy, domed appearance). This will take roughly 8 – 14 hours depending on the temperature of your room but there is no set time. Be patient. (Don't be tempted to put in a warm place eg airing cupboard and overprove which will result in lots of bubbles on the surface).
- Prepare an oval banneton by dusting the inside with rice flour.
- The dough should be proofed by around 8 pm – midnight (it will depend on your room temperature, mine takes 12 - 14 hours as pretty cold right now). Then do one final set of pulls and folds in order to form a ball of dough with surface tension.
- Tip the bowl upside down dropping the dough onto a dough scraper in your hand (helps keep an oval shape) and place it seam side up into an oval banneton.
- Dust the top and sides of the dough with rice flour (lifting away from the banneton) to prevent the dough sticking.
- Cover the banneton with its cloth cover (if it has one) or use an upturned bowl and place in the fridge to cold prove overnight. If making at another time of day this prove should be for a minimum of 3 hrs and up to 24 hrs. (The longer the time the more sour the dough will be).
- The next morning, invert the banneton onto a board lined with 2 sheets of baking paper. Dust the dough with more rice flour.
- Then use the baking paper as handles to lower the dough into a large 6.5 L slow cooker (Crockpot). Press the paper away from the edges of the dough to avoid indents.
- Use a bread lame or scalpel to score a pattern into the dough. (Don’t cut too deeply as this will just encourage the dough to spread).
- Place a folded tea towel over the slow cooker and place lid on top. Then fold the edges back onto the lid. (This stops condensation from dripping onto your loaf).
- Turn the slow cooker onto High and time for 2 hours. (If you have a metal lined slow cooker then set for 1 hour 45 minutes).
- Open up the slow cooker and check that the sourdough is baked. by pressing a finger gently into the top of the loaf. It should spring back. Tap the base of the loaf with your fingernails and there should be a hollow tapping sound ie not doughy. If you have a digital thermometer the temperature should be a minimum of 93°C (mine have been between 96 - 100°C).
- If the loaf isn’t ready then continue cooking for another 15 – 30 minutes maximum.
- Once ready, lift the sourdough loaf out with the baking paper and place just the loaf onto a wire rack.
- Allow to cool completely for 2 – 3 hours before slicing. Slicing whilst still warm will result in a gummy loaf. Enjoy!
Video
Notes
- This sourdough bread recipe works best in a 6.5 L slow cooker (Crockpot) but if you don’t have one you can use a 3.5 L one. If using the 3.5 L slow cooker the top of the loaf will be softer so to avoid that turn the loaf upside down halfway through cooking or finish off under grill (broiler).
- For the best result use an oval sized banneton and this is only option for the 3.5 L sized slow cooker.
- Do not use greaseproof paper but baking paper which you can re-use.
- If you find your slow cooker is giving a hard base to the sourdough loaf you can try adding a dusting of semolina to the base of the slow cooker.
- You don’t have to stick to my timings you may find they don’t work for you so starting late afternoon is another option. You'll do the bulk ferment overnight and the cold prove in the fridge during the day.