

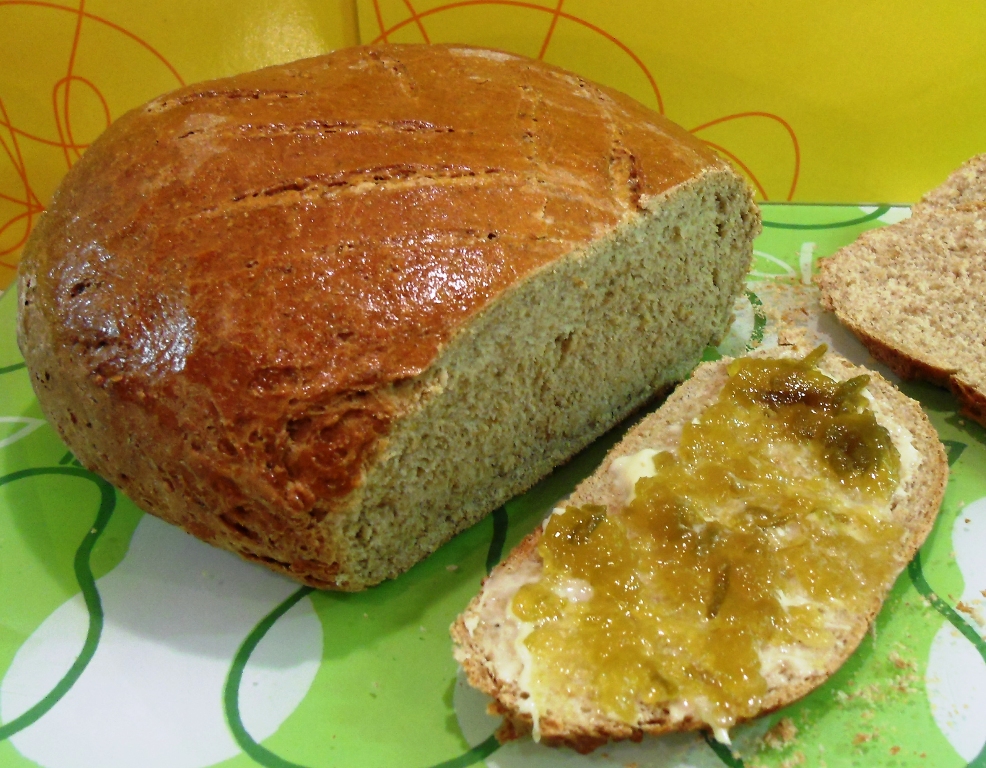
Having recently been snowed in and running low on baking ingredients I decided that the long neglected bag of rye flour I’d bought must get an airing. The first rye loaf I attempted was a long and drawn out recipe where you had to place the yeast, water and some rye flour in a warm place over night with a tea towel over it. In my stupidity I placed cling film over the bowl and thereby suffocated and killed my starter! Hence I wanted to bake something far simpler and quicker and set about creating this Simple Rye Loaf.
This loaf was delicious and the crust was heavenly so I will definitely be making it again. Mine came out of the oven at tea time so we had it with jam but it would be great for breakfast or Danish Open Sandwiches (Smørrebrød) as a change from the more traditional dense Rye Bread!
I am entering my Simple Rye Loaf into Roxana’s Home Baking “Bake your own Bread” monthly event and Wild Yeast’s “Yeastspotting” event! Then there’s Breakfast Club from Helen at Fuss Free Flavours which is being hosted by Janice at Farmersgirl Kitchen this month where the theme is cooked or baked. Finally there’s the “Fresh from the Oven Challenge” where the theme is lunch, which is being hosted by Michelle at Utterly Scrummy this month and alternately with Claire at Purely Food.
 First mix the yeast, sugar, butter, egg and milk together.

Then mix in the salt, flours and sesame seeds.

Carry on mixing until you have a dough.

Make dough into a ball, cover in cling film and put to prove in a warm place.

After an hour the dough should have doubled in size.

Knead the dough several time then shape & put on a baking sheet & bake.

Once cooked place on a cooling rack.
Simple Rye Loaf
Ingredients
- 1 Sachet Easy Bake Yeast
- 1 tbsp Light Muscovado sugar
- 3 tbsp Melted butter cooled to luke warm
- 1 Egg
- 220 ml Luke warm milk slightly warmer than hand hot 43°C
- ½ tsp Salt
- 140 g Rye flour
- 290 g Plain white flour
- 70 g Plain wholemeal flour
- 1 tbsp Sesame seeds
- 1 Beaten egg
- 1 tsp Vegetable oil
Instructions
- Using the whisk attachment on a stand mixer, mix together the yeast, sugar, melted butter, egg and milk.
- Then change the whisk for a dough hook and add the salt, the 3 flours and sesame seeds.
- Blend together slowing for a minute before beating together on a medium setting until a ball of dough is formed.
- Place in a lightly oiled bowl, cover with cling film and put in a warm place until doubled in size (about 1 hr).
- Lightly grease a baking sheet.
- Knead the dough several times and make a nice neat dome hiding any creases underneath. Put a few decorative slashes on the top.
- Place on baking sheet, cover with cling film and put in a warm place for about an hour until doubled in size.
- Pre-heat oven to 170°C
- Brush the loaf with the egg wash and bake until lightly browned about 37 – 40 minutes. (Test by knocking loaf on back and if hollow noise it’s ready).
- Cool loaf on a wire rack.
Gaynor
Made this and really enjoyed it, thank you for a great recipe.
Camilla
Great Gaynor, I must make it again soon myself! Thanks for your lovely feedback:-)
Eb Gargano
This looks so yummy! And so simple. My kind of recipe!
Camilla
Thanks, hope you manage to give it a go:-)
CompetiTom
Sounds delicious!
Ursula Hunt
Great easier recipe
Paul Wilson
Must try and use more of these alternative types of flour. They are tasty and add an extra dimension of flavour.
Camilla
They really do:)
Maddy
How did you get on when you entered this in Roxana’s Home Baking “Bake your own Bread” monthly event and Wild Yeast’s “Yeastspotting” event?
Camilla
I really don’t remember!
Paul Wilson
I love loaves like this.
Heather Haigh
Never made bread but yours looks great.
Carolyn Clapham
I think I have some rye flour in the cupboard that needs using up, so this will be a great way to do that!
Javelin Warrior
This is so simple to make, Camilla! Most of the time it seems like homemade breads have about 200 steps to get them right, but this is quick and easy – love it! I’m a huge fan of baking my own bread, so thank you so much for sharing…
Camilla
Thank you Mark, it really is no effort at all and I wish more people would give it a go as it’s far more satisfying than using a breadmaker, it’s it’s own little art form:-)
Barbara
I love all Rye Breads and yours looks great!
I found you through Yeast Spotting – thanks for contributing and for sharing all your hard work and expertise!
Camilla
What a lovely thing to say, thank you so much:-)
Jacqueline @How to be a Gourmand
I seemed to have missed this post before. What a cracking glaze you have on that loaf – really professional. I really admire your patience for making your own bread – I’m sure the taste is so much better 🙂
Camilla
It really is so easy, especially when you use a stand mixer and the time between provings just goes so quickly when you are getting on with other things! It gives a lot of satisfaction for very little work. I had a breadmaker once but sold it as it took up loads of room, only made squarish loaves, was no fun and the loaves never tasted as good as hand-made ones!
Janice
Thanks for entering your bread for Breakfast Club, it looks like ‘a good bake’ as they say. I’m making Rye bread this weekend, feel like we are baking in parallel, first the Yorkshires and now the rye bread!
Camilla
Thanks Janice:-) Spooky look forward to seeing yours!
Laura@howtocookgoodfood
What a great loaf, rye is a flour I use sometimes but would like to use more. This is a loaf that looks so good. Hard to beat a slice of home made bread and it is so much more economical as well as tastier than shop bought :))
Camilla
Thank you for your lovely comment. Think I might make another one this weekend as the crust was out of this world:-)
Jen @ BlueKitchenBakes
I’ve only ever baked with white or wholemeal flour and I really should have a go at trying different flours this year. This beautiful looking loaf has inspired me to do just that 🙂
Camilla
Aah, thank you Jen:-)